PostgreSQL Beginner Tutorial II: Basic SQL Programming
This blog covers part 2 of a series of tutorials explaining PostgreSQL. In the previous tutorial, I covered the basics of using the pgAdmin 4 graphical user interface. We were able to create a database, add tables to the database, add data to the tables and create queries without having to write any SQL. Of course, only using the GUI functionality is a completely inefficient way of managing your database. Therefore, for this tutorial we will cover the basics of SQL programming. These tutorials build up on one another, so, if I don’t explain how to do a task in this tutorial, that is because I explained it in the previous one.
The topics covered are:
- Create a new schema and set it to default
- CREATE TABLE statement
- INSERT statement
- SELECT statement
- UPDATE statement
- DELETE statement
Prerequisite tasks: Create a new database called tutorial2.
Create a New Schema
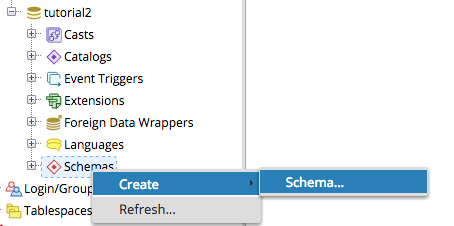
The first step we’ll work on is to add a new schema and set it to be our default schema. To create a new schema right click on Schemas in the tree control > click on Create > then click on Schema.

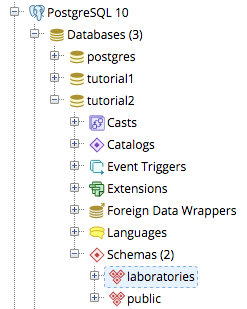
This will prompt a Create-Schema window. In the General tab, enter the desired name of the new schema. In this tutorial, I will choose the schema name to be laboratories. Next, click the Save button to create your new schema. The newly added schema can be seen on the tree control under Schemas.

The default schema is public schema, therefore, any SQL query you execute will be executed in the default schema, unless the schema name is added to the queried object in the query. To avoid having to do that every time, we will set our laboratories schema to be the default one. To set it to default for the current session execute the following statement (using the Query Tool):
SET search_path = laboratories;
SQL CREATE TABLE Statement
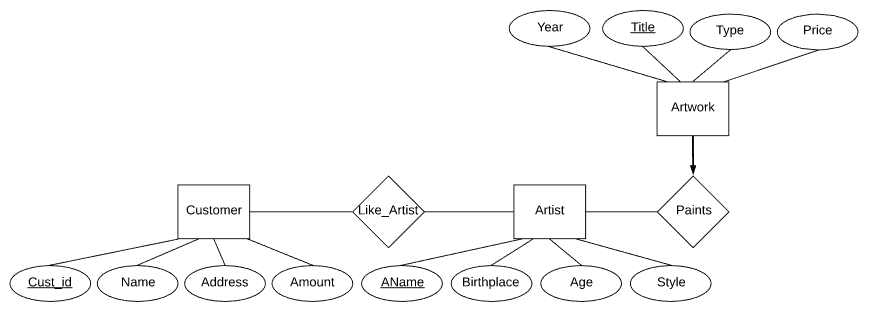
The tables (and associations between tables) that we are going to create are presented in the below ER diagram.

We can model the data in the ER diagram above using 4 tables. Since the focus of this tutorial is to to learn SQL programming, I will not explain how to convert an ER diagram to a relational schema. The following are the four tables that we need to create.

The general syntax to create a table in SQL is:
CREATE TABLE TableName
(
    column1 datatype1,
    column2 datatype2,
    ...
    columnN datatypeN,
    constraint1, constraint2, ... , constraintM
);
Therefore, to create the table Artist, execute the following SQL code (using the Query Tool):
CREATE TABLE Artist
(
	AName VARCHAR(20),
	Birthplace VARCHAR(20),
	Style VARCHAR(20),
	Age INTEGER,
	PRIMARY KEY (AName)
);
Similarly, the following is the SQL code for the tables Customer, Artwork and LikeArtist.
CREATE TABLE Customer
(
	Cust_id INTEGER,
	Name VARCHAR(20),
	Address VARCHAR(20),
	Amount NUMERIC(8,2),
	PRIMARY KEY (Cust_id)
);

CREATE TABLE Artwork
(
	Title VARCHAR(20),
	Year INTEGER,
	Type VARCHAR(20),
	AName VARCHAR(20),
	Price NUMERIC(8,2),
	PRIMARY KEY (Title),
	FOREIGN KEY (AName) REFERENCES Artist

);

CREATE TABLE LikeArtist
(
	Cust_id INTEGER,
	AName VARCHAR(20),
	PRIMARY KEY(AName, Cust_id),
	FOREIGN KEY (AName) REFERENCES Artist,
	FOREIGN KEY (Cust_id) REFERENCES Customer

);
SQL INSERT INTO Statement
The general syntax to insert data into a table is:
INSERT INTO TableName(column1, ... ,columnN) VALUES (value1, ... ,valueN);
Note that attribute values that are characters are quoted by a single quote ‘ ‘, while numerical values are not quoted.
For this tutorial, let’s insert values into the Customer, Artist and Artwork tables.
- Customer(Cust_id, Name, Address, Amount) Table
- (1, ‘Ahmed’, ‘Ottawa’, 10)
- (2, ‘Jessica’, ‘Toronto’, 11)
- (3, ‘Josh’, ‘Montreal’, 5.0)
- Artist(AName, Birthplace, Style, Age)
- (‘Claude Monet’, ‘Paris’, ‘Impressionism’, ‘86’)
- (‘Joseph’, ‘Ottawa’, ‘Modern’, ‘31’)
- (‘Frida Kahlo’, ‘Coyoacan’, ‘Cubism’, ‘47’)
- Artwork(Title, Year, Type, Price, AName)
- (‘Painting of Painting’, 2010, ‘Modern’, 10000.00, ‘Joseph’)
- (‘End of Summer’, 1991, ‘Impressionism’, 700000.00, ‘Claude Monet’)
Using the syntax above, the following are the SQL statements to add the values above:
-- Insert into Customer table
INSERT INTO Customer(Cust_id, Name, Address, Amount) VALUES  (1, 'Ahmed', 'Ottawa', 10);
INSERT INTO Customer(Cust_id, Name, Address, Amount) VALUES  (2, 'Jessica', 'Toronto', 11);
INSERT INTO Customer(Cust_id, Name, Address, Amount) VALUES  (3, 'Josh', 'Montreal', 5.0);

-- Insert into Artist table
INSERT INTO Artist(AName, Birthplace, Style, Age) VALUES ('Claude Monet', 'Paris', 'Impressionism', '86');
INSERT INTO Artist(AName, Birthplace, Style, Age) VALUES ('Joseph', 'Ottawa', 'Modern', '31');
INSERT INTO Artist(AName, Birthplace, Style, Age) VALUES ('Frida Kahlo', 'Coyoacan', 'Cubism', '47');

-- Insert into Artwork table
INSERT INTO Artwork(Title, Year, Type, Price, AName) VALUES ('Painting of Painting', 2010, 'Modern', 10000.00, 'Joseph');
INSERT INTO Artwork(Title, Year, Type, Price, AName) VALUES ('End of Summer', 1991, 'Impressionism', 700000.00, 'Claude Monet');
SQL SELECT Statement
The general syntax for a simple SELECT query is:
SELECT column1, column2, ... ,columnN
FROM table_name;
WHERE condition;
Let’s take for example the query ‘List all artists that have an age that is less than 50’. This query requires us to list all the entries/artists in the table Artist such that the artist is younger than 50. Therefore, the SQL query is:
SELECT *
FROM Artist
WHERE Age<50;
Note that I made use of the * character which is a wild card character that returns all the columns in the specified table.
After executing the above SQL query, you should get the following output:

Let’s take another example query ‘List the name and id of every customer that lives in Toronto’. This query requires us to list all the names and customer ids of the entries/customers in the table Customer such that the customer lives in Toronto. Therefore the SQL query is:
SELECT Name, Cust_id
FROM Customer
WHERE Address='Toronto';
After executing the above SQL query, you should get the following output:

SQL UPDATE Statement
The general syntax for an UPDATE query is:
UPDATE table_name
SET column1 = value1, column2 = value2, ... , columnN = valueN
WHERE condition;
Let’s take for example the query ‘Update the artist’s Joseph’s age and birth place from 31 and Ottawa to 33 and Montreal’. This query requires us to change the entry that contains Joseph as a name in the table Artist. Therefore, the SQL query is:
UPDATE Artist
SET Age=33, Birthplace='Montreal'
WHERE AName='Joseph';
Let’s take another example query ‘Update the age and birth place values for ALL the artists to be 33 and Montreal’. This query requires us to update the entries/artists in the table Artist by changing the age field to 33 and the birthplace field to Montreal. Therefore the SQL query is:
UPDATE Artist
SET Age=33, Birthplace='Montreal';
Note that we didn’t have to include a ‘where’ clause because the update was requested for ALL the artists.
SQL DELETE Statement
The general syntax for a DELETE query is:
DELETE FROM table_name
WHERE condition;
This statement deletes the row that is in the selected table that satisfies the given condition. Let’s take for example the query ‘Remove Artist Frida Kahlo from the database’. This query requires us to delete the entry/artist in the Artist table that has a name of Frida Kahlo. Therefore, the SQL query is:
DELETE FROM Artist
WHERE AName='Frida Kahlo';
To sum up this tutorial, let’s take one last example query ‘Remove ALL the remaining artists from your database’. This query is not as simple as the other queries. If you try to delete the entries in the table Artist you’ll get a ‘violates foreign key constraint’ error. This is because the Artwork table has a foreign key to the Artist table. Therefore, you’ll have to apply two delete operations: first on the Artwork table, then on the Artist table:
--First delete all the entires from Artwork table
DELETE FROM Artwork;

--Second delete all the entries from Artist table
DELETE FROM Artist;
This concludes our tutorial. In the next tutorial we will cover the remaining basic material in SQL programming.
References:
- Most of the examples and queries presented in this tutorial are taken from the CSI2132 lab 2 material that can be found here.